How to Create Passages & Links
Most of the time, you’ll be linking from one passage to another. The easiest way to do this is to put the name of the passage you’re linking to in between two square brackets, [[like this]]. This will turn the passage name into a clickable link. This is just like our Wikimedia system…
[[Open]] the time door…
[[Open the time door]]…
Open the [[time door]]…
Everything in brackets will be highlighted link [and the title of your next passage]
However, you may also want to have the text shown on the page be different from the passage name. For example, you might have two ways to reach a passage, or you may not want to give away the name of the destination. In these cases, you can write this:
- [[Open the time door | into the fire]] Open the time door will be the text URL (but the player will be taken to the fire passage…
Adding an Image
Once you know what your image’s URL is, having it display in your story is as simple as entering the correct HTML code to show up: You can upload images and audio files to your websites (or host them on google drive or dropb ox).
<img src="the URL of your image" width="500" height="300" alt="Two foxes">

<img src="the URL of your image"alt="Two foxes">
The width and height part of the code control the size of your image on the page. If you leave them off, then it will display the image in the dimensions as you saved it. This is good reducing size. However, if you increase size or alter the dimensions, the image may look distorted or pixelated. Do the MATH (ratios) to ensure that consistent dimensions if you enlarge or reduce image size.
Adding a Background Image for Entire Twine (Style Sheet Editor)
To add background image or animated .gif, make sure you select image of high quality/large size. Go to CSS editor:
tw-story { background-image:url(ENTER YOUR URL HERE); background-size:cover; }
example:
tw-story { background-image:url(http://www.seriousplaylab.com/twine20/portal.jpg); background-size:cover; }
if example above does not work, try adding the “quotes” from around the URL (like this below).
tw-story { background-image:url(“http://www.seriousplaylab.com/twine20/portal.jpg”); background-size:cover; }
Adding a Different Background Image for Different Passages
tw-story { background-image:url(“ENTER YOUR URL HERE”); background-size:cover; } Code with tag: – The tag here is the word “snow” tw-story[tags~=”snow”] { background-image:url(“ENTER YOUR URL HERE”); background-size:cover; }
Example below: In the Style Sheet Editor I added this code. The tag (e.g., home or portal) is created on the passage page (very top there is create “tag” option). NOTE (make sure the “quotes” below are reformatted currently if you cut and paste this to the Twine).
tw-story[tags~=”home”] { background-image:url(http://www.seriousplaylab.com/twine20/portal.jpg); background-size:cover; }
tw-story[tags~=”portal”] { background-image:url(http://www.seriousplaylab.com/twine20/tt.gif); background-size:cover; }
Adding a Video
If you’d like to embed a video from a service like YouTube or Vimeo, check the page for an option to embed it. See YouTube’s help and Vimeo’s help for specific instructions on how to get the embed code and customize it. Once you have that code, enter it as-is into your passage to have it display. YouTube or Vimeo, check the page for a “share” option to embed it. E.g., on Youtube: you hit “share” and select “embed” (cut & paste the hmtl code into your passage]…
The code to enter for a video (that you are hosting) is similar to what you use for an image:
<video src=”the URL of your video” width=”640″ height=”480″> </video>
There are a lot more options for customizing how your video appears – try this HTMl5Rocks article for details.
Adding Sound Effects and Music
The code to add a basic sound effect (Harlow, default) looks like this. This would go in the passage where you want the sound to start…
<audio src="http://www.seriousplaylab.com/twine20/twinesound.mp3" autoplay>
The autoplay attribute causes it to play as soon as the passage it is in is displayed.
However before you can make this work, you need to do some Java work: Go to the Edit Java Script editor. Add the following code, but substitute my audio URL for the audio URL you would like to use.
var audio = document.createElement('audio');
audio.scr =
'http://www.seriousplaylab.com/twine20/twinesound.mp3';
audio.loop = true;
audio.play();
For multiple audio pieces with your Twine, see following example:
{
var audio = document.createElement('audio');
audio.scr =
    'http://www.seriousplaylab.com/twine20/twinesound.mp3';
audio.loop = true;
audio.play();
}

{
var audio = document.createElement('audio');
audio.scr =
    'http://www.seriousplaylab.com/twine20/eurorack2.wav';
audio.loop = true;
audio.play();
}
Create/Edit your Soundtrack or Sound Effects of Passage Voice-Work
I saved this file as an MP3 and uploaded to my site (or googledrive etc). Garage Band.

I saved this file as an MP3 and uploaded to my site (or googledrive etc). Audacity.

How to Format Text
You’ll notice that there aren’t buttons to add bold or italic styles to your text in Twine, like in a word processor. Instead, Twine story formats use special characters to convey style information. The special characters you type are changed into styles when you play or test your story.
The fastest way to see how what you enter will be interpreted as a style is by using the Test From Here item in the passage menu.
The exact characters to enter depend on which story format you’re using. Harlowe (the default one) and Snowman both use Markdown, a commonly-used set of formatting instructions. SugarCube instead uses a convention similar to what’s used on Wikipedia 1).
| Harlowe | Snowman | SugarCube | |
|---|---|---|---|
| Bold | **Bold** or ''Bold'' | **Bold** | ''Bold'' |
| Italics | *Italics* or //Italics// | *Italics* | //Italics// |
| Underlined | <u>Underlined</u> | <u>Underlined</u> | __Underlined__ |
| For more information | Visit here | Visit here | Visit here |
You can combine styles in any story format by combining them, so that ***bold and italic*** will be displayed as bold and italic in Harlowe.
Change the Font, Colors, or Appearance
If you’re looking for simple formatting changes such as bolding or italicizing text, then the How to Format Text page will help you out.
But what if you’d like to change the font or color scheme of your published story? The best way to accomplish that is to edit your story’s stylesheet. This uses CSS, a standard web technology.
If you’ve never written CSS before, there are many tutorials out there that can help you learn it. The Mozilla Developer Network in particular has a very comprehensive tutorial.
Basic changes are not terribly complicated. Let’s talk about some two common scenarios.
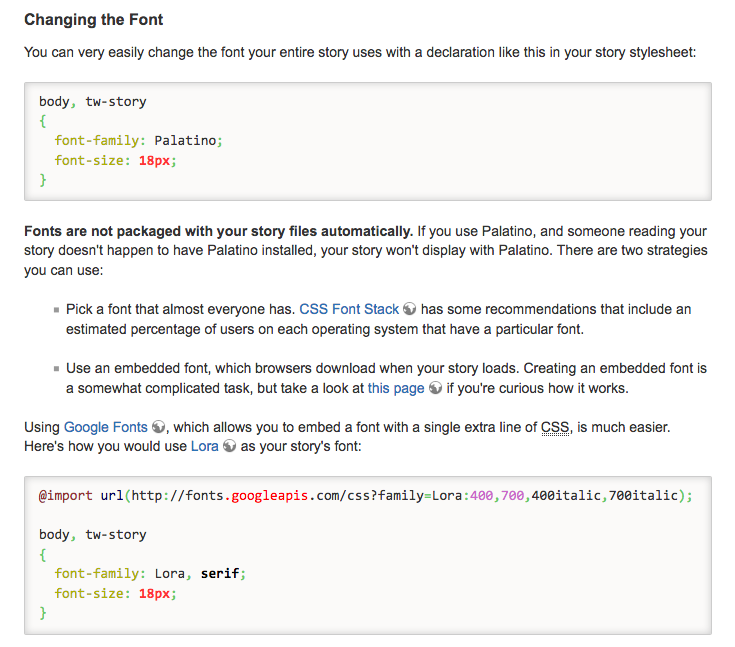
Changing the Font
CSS Editor
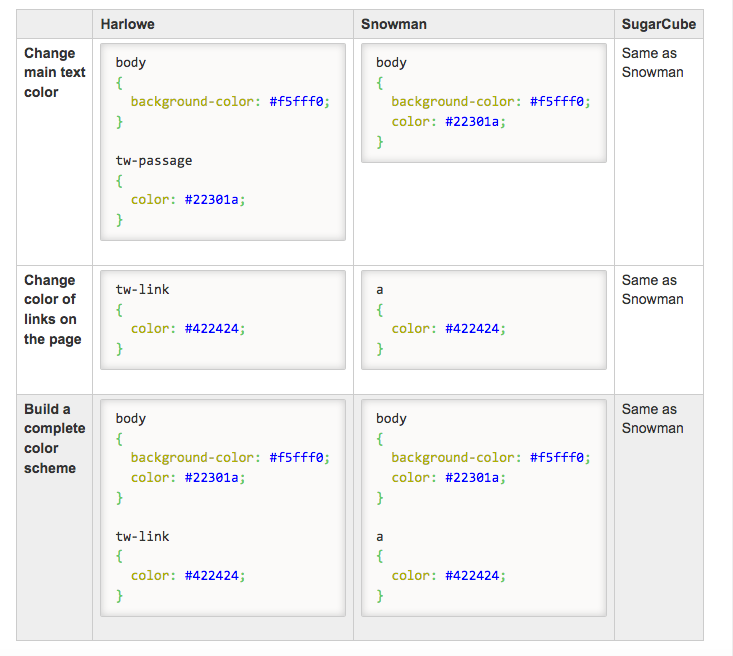
Changing the Color Scheme
Colors are recorded in CSS in variety of ways, but the most succinct and commonly-used is called a hex triplet. The first two digits represent how much red the color contains, the second duo how much green, and the final how much blue. So, pure red is written as #ff0000. 1) You can play with colors with online tools like Adobe Color or Paletton, and then using the hex triplets in your own code.
Add HTML
If you’d like to add HTML to your story – for example, some text you have customized, or you have some code to embed a resource like a YouTube video – you can add it directly to your passage’s text. It will displayed exactly as you’ve entered it.
